Table of Contents
About import definitions and data headers
Like many other data import applications, import definitions must be established before the initial upload of a data file into the Veonics system. After the import definition setup and initial data upload, it's important that subsequent data files are uploaded with the same headers as the initial file.
Differences in text casing and spaces in data field headers will cause issues with import.
In this article the term "header" is synonymous with "field name", "field header" and similar. Common examples for Veonics users are First Name, Last Name, Title, ID Number.
Set up data file for import
- Confirm there are no obvious data quality issues.
- Delete any text found to the side or below the actual badge data (instructions, etc)
- Delete headers and corresponding data that does not need to be imported into Veonics
- Review - delete any unneeded text and confirm no excessive text lengths (Veonics will not import fields with long headers)
- Save file to your PC or drive
- Use 'Save As' if necessary to save under desired filename.
- File type must be .csv or .xlsx
Using Import Wizard
Import Wizard is found on the Record Manager page
- Hover mouse over 'Import/Export' button to expand menu
- Click on 'Import Wizard'
- Click on 'Choose' to browse and select the import file to be uploaded
- Use drop-down menu and select '(Create New)' and click 'Next' in the top-right of the page

- The the data file will appear on the next screen, this is where the fields are 'mapped' and the import definitions are created
- Click on each header and match it to its equivalent header in Veonics
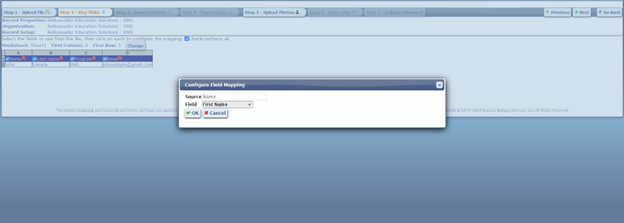
-
- It's preferred, but not necessary, that field text matches exactly
- When finished matching, click 'Next'
- Type in name of data definition into blank field, for example - "HR system headers June '24"

- Click 'Next' to begin import
- Wait for green loading bar to complete. Do not click 'Next' again during this step.
- Click 'Go Back' at top-right of the page
- Photo upload and matching is handled via Photo Wizard, see below for how-to article
(You cannot use the same data definition for different file types, .xlsx or .csv . A new definition must be created for a first time upload of a different file type)
Using existing Data Definitions
- See 4th bullet point above - instead of clicking '(Create New)', click the data definition that was created last time. This will only work if the field header text is the exact same as it was upon creation of the data definition.
- Click 'Next', confirm correct mapping of fields
- Click 'Next', (no action needed on this step)
- Click 'Next', wait for green loading bar to complete. Do not click 'Next' again during this step.
- Click 'Go Back' at top-right of the page
Review imported data
- Return to Record Manager screen
- Sort by Date to view the most-recently updated records
- Records from uploaded file should be appear at the top
- Sometimes, no date stamp is given to the newly-imported records, the field is left blank.
- To find these records - Sort by Veonics ID (field labeled 'ID' on far left).
- The highest-numbered ID numbers are the newest records
- Sometimes, no date stamp is given to the newly-imported records, the field is left blank.
- Photos can be assigned in a few ways - individually in card view, on the Photos menu (via Record Manager), or with the Photo Wizard (also via Record Manager).
- Photo Wizard is the preferred method for mass upload and matching of badge photos
Click here for Photo Wizard instructions
Note on critical identifiers
Fields can be designated as "Critical" which means that they are meant to be unique
- (i.e. employee number, D/L number, email address).
When Import Wizard is used on records and data with critical identifiers it will update a record instead of create a new one.