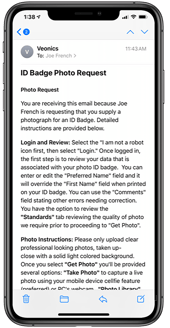
COMPANY Security ID Photo Request
You are receiving this email because your COMPANY requests that you supply a current photograph for an ID Badge. You should have been notified previously that eXpress badging is requesting photos on behalf of COMPANY using eXpress badging® Veonics® Portal credential management software.
Security Vetting:
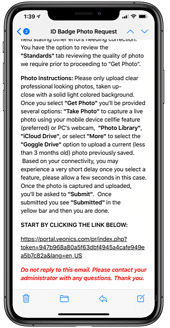
Emails are sent from noreply@veonics.com. If you have any security concerns, please verify with your supervisor. DO NOT verify directly with eXpress badging or Veonics!
Your Four Steps
Please take your time and complete each step as instructed before moving to the next. By following this process correctly, you won't have to attend an in-person photo capture session.
This process was documented using iOS and will vary for other mobile OS platforms.
-
Receive the email requesting the photo upload
- Open the Veonics® Cellfie request email
- Read the contents of the email
- Select the hyperlink
-
You must read and select "Yes" in the Privacy Statement
- READ HERE
- If you select No, you won't be able to continue and must contact your supervisor

-
Authentication Process
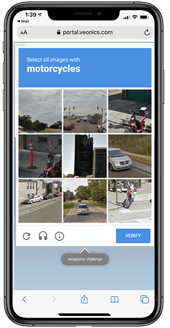
- There are three variations of authentication that can be used by your company:
- CAPTCHA (used by most)
- Select “I am not a robot” then select "Login"
- Select the correct “Images” as instructed
- Select “Verify” when completed
- If failed, repeat with new images
- If failed, repeat with new images
- Email (optional)
- Enter the email used in the CELLfie Request
- Most likely, it's your employee or student email address
- No Authentication (optional)
- You are taken directly to the Veonics® CELLfie Portal upon selecting the hyperlink
- CAPTCHA (used by most)
- There are three variations of authentication that can be used by your company:
-
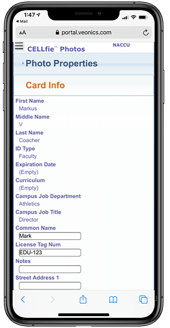
Photo Submission using the CELLfie Photos tab
- Review the "Photo Properties" for Tips
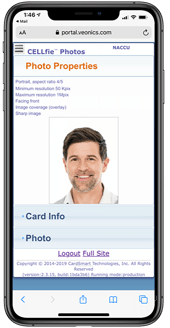
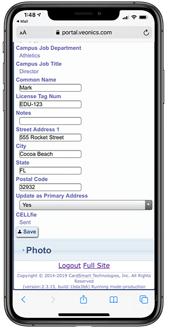
- Select the “Card Info” tab and review that your information is correct
- If CELLfie editable fields are enabled, you can edit applicable fields
- If you see there are errors in your data, contact your supervisor
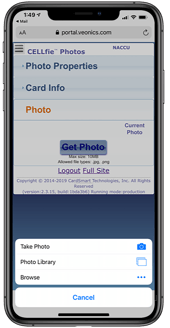
- Select the "Photo" tab
- You may need to scroll down to see the "Photo" tab if there are many lines of data
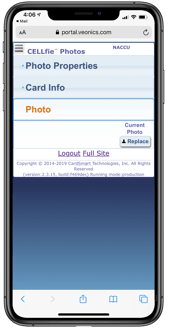
- You may need to scroll down to see the "Photo" tab if there are many lines of data
- If no photo exists, select the “Replace” icon
- Select the “Get Photo” icon
- Pay attention to the specifications listed under the icon
- MAX size: 10MB
- Only File Types Accepted: jpg or png
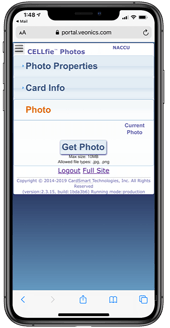
- Pay attention to the specifications listed under the icon
- From the drop-down, select one:
- "Take Photo" to access your camera (most commonly used)
- Reverse the camera and take a Selfie
- Alternatively, have someone take your photo
- Select “Use Photo” if acceptable to COMPANY photo standards
- Select “Retake” to take a new photo if needed

- Select “Retake” to take a new photo if needed
- Reverse the camera and take a Selfie
- "Photo Library" to access photos on your device (rarely used)
- Navigate to image and select “Done”
- "Choose File" to access photos on your computer (rarely used)
- Using your file navigator, select the image and then select “Done”
- "Take Photo" to access your camera (most commonly used)
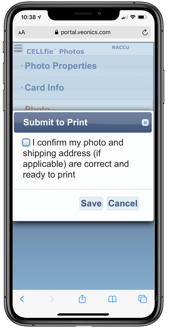
- Select “Submit” then “Save” when the "Submit to Print" window appears
- After a few seconds, the window will refresh with a yellow "SUBMITTED" screen, and your session is complete
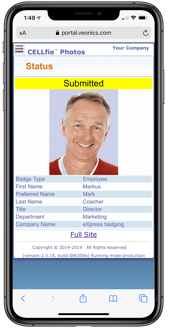
- You will not be able to use the email link again
- Please feel free to contact your supervisor to request a retake submission if you need it
- If the submitted photo does not meet published standards, it may be rejected, and you will have to repeat these steps
- Review the "Photo Properties" for Tips