How to use the Print button (for a single print)
- Create and approve your badge records
- In Record Manager - Click
 to begin creating new badge
 - Enter all badge holder information
- Click Save
- Click Approve
- Click Print
- In Record Manager - Click

-
- The record must be in an Approved status to be able to print
-
Note: It is recommended to confirm your default badge printer settings before going to print in Veonics. Default print settings can be set up in the Control Panel > Devices and Printers menu.
-
- The Print Preview will open after clicking Print on Approved record
- Badge printer settings can be adjusted at this time using the "Print using the system dialogue" hyperlink near the bottom of the menu.
- The printer defaults will be used if no changes are made to settings at this time.
- Ensure the correct badge printer is selected and click Print
- The badge will now be printed.

How to use the Print button to print more than 1 badge
- Create and approve your badge records
- In Record Manager - Click to begin creating new badge
- Enter all badge holder information
- Click Save
- Click Approve
- (Repeat for multiple badges)
- Click
 to return to Record Manager when finished
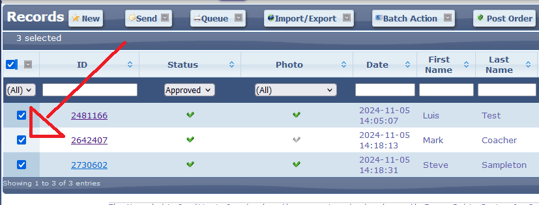
- In Record Manager - Click
-
- Sort by Approved records
- Select the checkbox for the badge(s) to print
-
-
- Badge records must be in an Approved status to be able to print
-
-
- Click

- See ABOVE STEPS
- Badges will print in the order they were created (ascending Veonics ID number)
- Double sided printing must be selected, or each side will print on 2 separate cards
- Click
How to print records that have been printed (Printed status)
Single record -
- Search for Printed record,
- If badge record needs editing -
- Click the ID number hyperlink to open record
- Click Edit to make changes,
- Click Save
- Click
 to place records in an Approved status.
 - Click
- See ABOVE STEPS
Re-approving multiple records at one time -
- (Assuming all necessary edits have been made)
- In Record Manager - search for Printed records and select multiple via the checkbox
- Under Batch Action tab, click Reprint
- Badge records will change to Approved status
- Click
- See ABOVE STEPS
