Table of Contents
Live Photo Capture Enrollment
You can live capture the photo using a web/digital camera that is connected to your
Step 1: Confirm your camera is enabled on your PC or mobile device
Step 2: Select the Capture icon on the screen and follow the instructions
Upload Your Existing Photos
Step 1: Select the “Upload” icon on the “Photo ” line.
Step 2: Select the “Choose File” icon, then map to your saved photo.
Step 3: Select the file (highlight), then select “Open, then select “OK”.
Remote Photo Capture using Veonics® CELLfie
When an email is entered in the Record Manager field, you can submit a Veonics CELLfie email request that instructs the recipient to upload their photo securely. Once received, you’ll then follow the Validation process below.
Photo Cropping and Validation
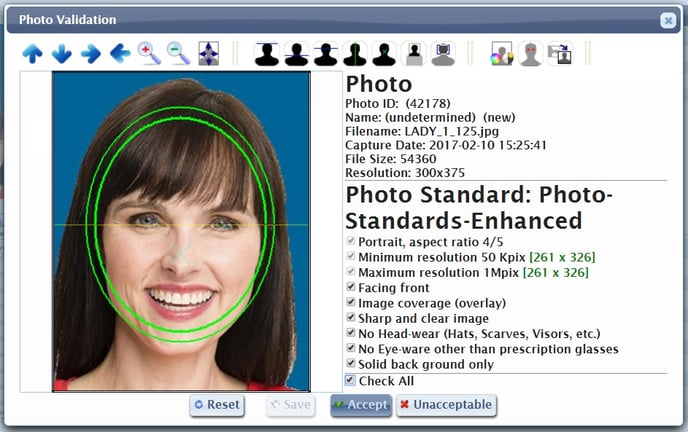
Once the photos are joined to each badge record, you validate (review, edit, crop, approve) each photo. This ensures your photos meet your organization’s quality standards and match the associated badge record.
Step 1: Select the “Crop/Validate” icon.
Step 2: Using the plus and minus magnifying glasses on the top banner, adjust the photo so the face fits within the alignment oval provided.
- Pay attention to the attributes published on the right, edit until “Red” becomes green “Green” if needed
- There are other settings in the upper banner you can use to make a bad photo better as well.
Step 3: Once the photo is acceptable, select the “Check All” box (or check all boxes manually) and then select “Accept”
Batch Upload
You can also batch-upload photos and match/link them to each badge record in the Records Manager section.
PHOTO WIZARD
You can select the “Photo Wizard” icon with the Card Group section for photo importing and matching.
AUTO MATCH
If your photo file name matches a field (“employee number”.jpg) or group of fields (“lastname”_”first”.jpg) the photos will be automatically joined once you run the Match tool process.
- For any remaining unmatched photos, you will then manually join them to their associated record.
MANUALLY LINK
You can manually match photos to records by selecting the “Photos” icon on the Record Manager banner. This is an advanced process and will require training.