Veonics Print Queue Manager setup and configuration is an Administrative Level User feature.
Defining vPQM Attributes
- A system-assigned ID
- A free-text name is assigned to identify the queue
- An organization is assigned that determines the “scope” of the queue
- Users at a “lower” level can send jobs to a queue set “above” them
- Only users at the same queue level or higher can be “operators” of that queue and print from it
- The queue type (either proofing or not)
- Zero or more informational custom fields to help operators identify the capabilities of printers printing from this queue
- A list of vPQM-authorized Users who can send or release print jobs to a defined print queue
- The list of cards currently awaiting printing on that card
- To print, the card must be in the approved state
Multiple Print Queues
- An organization may create as many queues as needed
- It is essential that, while it is not (and cannot be) enforced, two vPQM™ stations should never be printing simultaneously from the same queue as it may result in duplicate printouts
- It is recommended to have at least one queue for each physical printer in the organization
- Possibly additional ones to hold cards with special requirements, such as pre-printed, security seal, RFID, and Magnetic card stock, and other variations
-
- You can always reassign groups of cards from one queue to another
Station Configuration
- Before setting up the vPQM, a Station must be assigned to users to enable printing
- Configured from the “Admin” menu, with type “vPQM”
- Each station is assigned to a single user, who must have the “VPQM System User” role
- It is also a best practice to assign VCDB System User rights.
- Each station is assigned to a single user, who must have the “VPQM System User” role
- This allows the portal to identify the operator who printed a specific card
- Configured from the “Admin” menu, with type “vPQM”
Printer Configuration
- Each printer may produce slightly different results
- The “Settings” screen permits adjustments to printer properties to obtain the best possible results and are saved for future executions
- Current settings include
- X/Y (horizontal/vertical) offset in pts (1/72th of an inch, default 0)
- X/Y zoom factor (default, 100%)
- One common reason for adjusting printer properties is achieving full-bleed in printers that support it
- The “Test” button prints a sample grid pattern to help in the adjustment of these parameters
“Automatic” Printing
- Enable automatic printing to release print jobs from the queue without user intervention
- It is also possible to run in automatic mode by specifying “-a” as a command-line argument
- When printing automatically, vPQM™ periodically polls the server to see if new cards have been sent to the queue, and if so, selects them and starts to print them
- This enables the vPQM to run in the background
- It is recommended that the operator periodically check the status of the printer and vPQM™ regarding hardware or connectivity issues that require human intervention and prevent operation
One vPQM™ Executable, Multiple Configurations
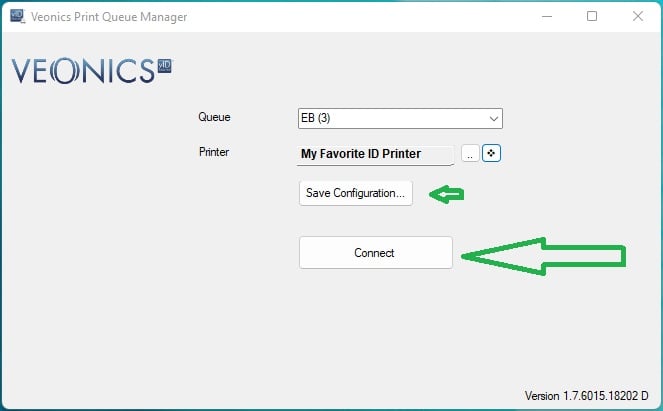
- The user is given the ability to save multiple configurations of vPQM™ for the same actual executable
- This saves the default username, server, station, printer, queue, and printer options, with a name assigned by the user
- It also creates a desktop shortcut to run vPQM™ with the specified configuration
- This enables the user to control multiple printers, from multiple queues, from a single computer, all working in parallel
- Examples
- vPQM - Duplex Color Black
- vPQM - Duplex Color Color
- vPQM - Duplex Color Black
- vPQM - Single-side Color
- vPQM - Duplex Color Black wLam
Debug Mode
- Create a root vPQM folder and save the vPQM
- Create a shortcut in the same folder and edit the target properties by appending a space then “-d” as a parameter
- "C:\Users\user.name\Desktop\VPQM-1.7.1.exe" -d
- Upon releasing the print job, a log file is generated along with copies of individual image files that are sent to the printer driver to be printed
- They are saved in the same folder where the VPQM executable file resided
- This information is useful to diagnose any issues with printing
- Sample debug text captured
- 1/2/2023 2:22:43 PM : No plugins loaded
- 1/2/2023 2:23:07 PM : No plugins loaded
- 1/2/2023 2:23:17 PM : Refreshing queue with 1 entries
- 1/2/2023 2:23:19 PM : printing VID
- 1/2/2023 2:23:19 PM : driver print (no plugin)
- 1/2/2023 2:23:20 PM : Printing front in color
- 1/2/2023 2:23:20 PM : Printing front. x:-2, y:-2, zx:100, zy:100
- 1/2/2023 2:23:21 PM : Printing back in black
- 1/2/2023 2:23:21 PM : Printing back. x:-2, y:-2, zx:100, zy:100
- 1/2/2023 2:23:22 PM : Marking entry 2032792 as processed
- 1/2/2023 2:23:23 PM : Refreshing queue with 0 entries
Printing Black-Only In the Back
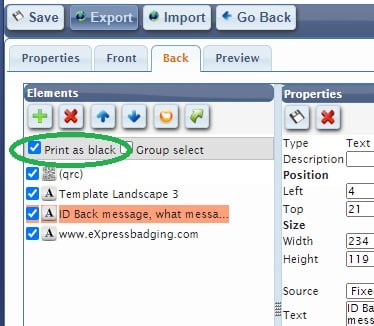
- First, make sure the design’s back is marked as “Print as Black”
- Design should contain only pure black or white elements
- Text, barcode, QR code, rectangle
- Avoid images
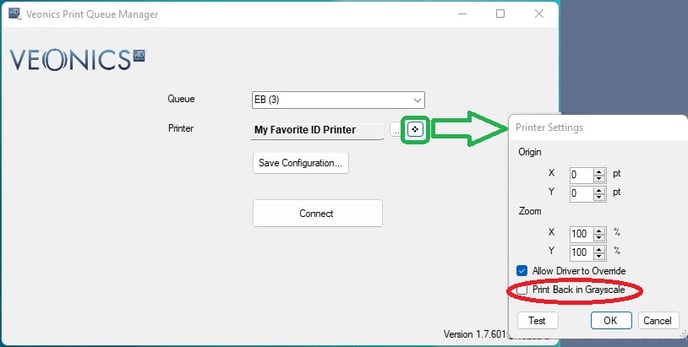
- Make sure VPQM’s settings uncheck the option to print back in grayscale
- Zoom should be set to 100%
- Set printer to use CMYKO-K ribbon
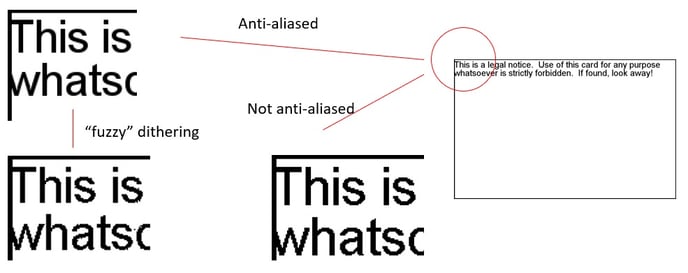
- The image sent to the printer will not be anti-aliases
- Pumped-up contrast to prevent dithering of grays