Table of Contents
- Record Properties
- Edit
- Photo
- Photo Wizard
- Obliterate
- Clone
- Deactivate
- Reopen
- Assign Families
- Define Catalog
- Record Manager
Record Properties
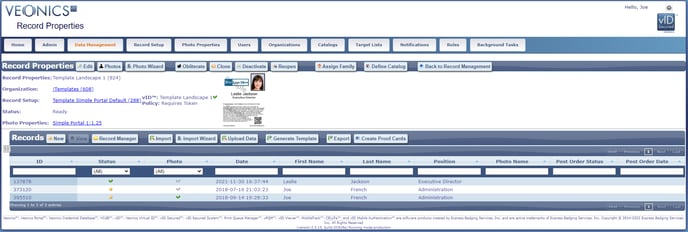 In the Record Properties section, there are also some components of Record Management; however, they are limited, and it is recommended to only manage the Properties aspect in this section.
Edit
Before editing, make sure the Record Property is not in an Approved state. If in an Activated state, the Reopen icon will be seen; select it, and then select OK in the Confirmation screen to continue. Once editing is finished, select the Activated icon and then select OK in the Confirmation screen to complete.
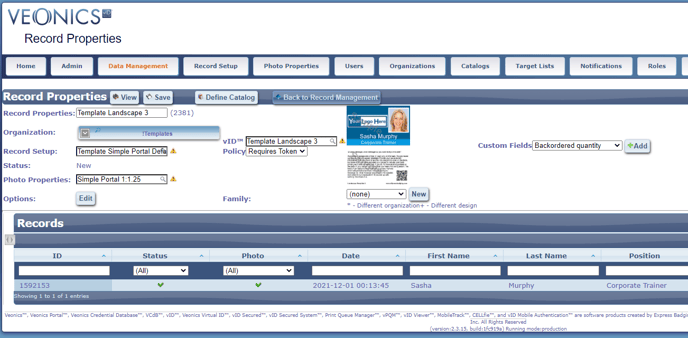
The primary function of Record Properties happens in the Edit mode assigning:
- Record Properties Name
- Naming should be intuitive
- ABC-Florida
- ABC-Texas
- ABC-Texas-Contractor
- ABC-Florida-Visitor
- XYZ-California
- XYZ-New York
- XYZ-California-Volunteer
- Naming should be intuitive
- Organization
- Start typing the name, and select the associated radio button
- Only one Organization can be assigned per Record Property
- Record Setup
- Start typing the name and select the correct Record Setup
- Only approved setups will appear
- Photo Properties
- Select one of the default properties
- Create custom properties from the Photo Properties primary tab on the Home page
- Requires assigned user rights
- Then assign it within the Photo Properties settings in Record Properties
- Options for the Veonics CELLfie(tm) and Veonics Virtual ID - vID
- Assign the E-mail Field
- Enable Auto-send CELLfie™ on import
- Cardholder Notifications
- Enable CELLfie™ Request without or with Edit feature
- Policy:
- CAPTCHA - CELLfie™ Recipient must complete the Captcha test to continue
- Email - CELLfie™ Recipient enters the same email address saved in their record
- No Verification - CELLfie™ Recipient enters upon selection of the CELLfie™ hyperlink
- Selected assigned CELLfie™ Reminder Notification Template
- Set the Reminder Period (Number of Days)
- Set the Reminder Count to the number of desired sends
- Assign the CELLfie™ Reject Notification Template
- Select an assigned vID™ Link Properties
- Synchronization Label
- Enable Skip Photo to allow record Approval without Approved Photos
- Sequence Seed
- Set the Identification Number value
- vID Template Designer, start typing in the template name to select the Design Template that was created using the same Record Setup assigned, and a preview should be displayed
- vID Policy relating to the security process of publishing the Virtual ID URL
- Public - Displays a basic URL and is not very secure as the numbering is sequential
- Requires Token - a tokenized URL is generated that allows access to the vID without login
- Requires Logn In - a tokenized URL is generated that allows access to the vID and requires login
- Family
- A great tool that is used to move Card Records between link Record Properties.
- Combined with Cloning a Record Properties, it is an ideal process to move records in a New or Approved State before Obliterating a large inactive Record Property.
- Be aware that photos are linked, not moved, from the source Record Property, so they will be deleted in the Family once the source RP is Obliterated.
- Custom Fields (if applicable)
- Select the Save Icon, and then when finished, select Activate so the Record Property is ready to be used. If not Activated, it may appear to work; however, some functionality may be inactivated.
Photo
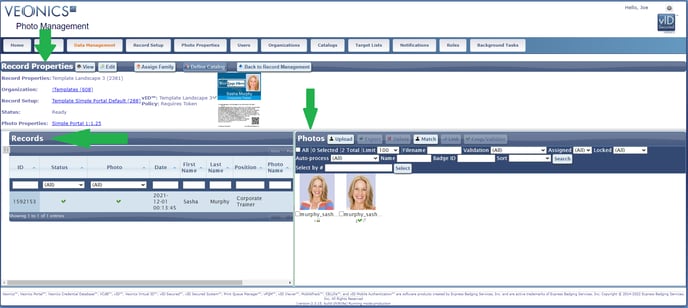
Photos will take you to the Photos Management section for this Card Group, where all photos can be viewed in a scrolling display
Record Properties - Displays the Record Properties, and associated icons will allow edits, leaving the Photo Management section.
Records - Displays all records within the Record Management section
Photos - Allows authorized users to
- Upload - batch import more photos
- Export - single or batch export photos
- Delete - single or batch export photos
- Match - match selected/filtered photos to Records on the left side
- Link - when one Record and one Photo is selected, they can be manually linked
- Crop/Validate - single or batch cropping and validation of selected/filter photos
Photo Wizard
The Photo Wizard tool is used when importing many photos into a Record Properties.
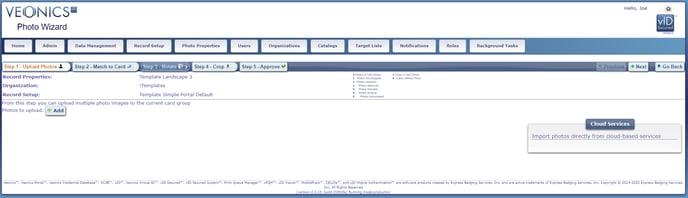
- Upload Photos - Select the Add icon to upload batch-selected photo files
- Match to Card - Link the correct photo to the correct record by building a Match File name structure by assigning related fields; lastname_firstname.jpg, then select Match.
- Rotate - Use this feature to batch-rotate any photos that were imported needing rotation
- Crop - Use this feature to batch-crop any photos that were imported to the correct height and width standard
- Approve - Use this feature to batch-approve photos that are correctly rotated and cropped
Obliterate
This will completely delete the associated Card Group (Properties and Management). It does not delete the Organization, Card Template, Record Setup, or Users. They must be inactivated individually.
Obliteration Process
Obliteration is the reverse process of creating an account to remove all data, photos, and Record Properties completely. As well as inactivate/delete template designs, users, catalogs, print stations, queues, fonts, photo properties, and notifications from the Portal. This includes steps to inactivate CUSTFILES and records in QuickBooks and HubSpot.
- Navigate to the Record Properties in the Data Management tab needing Obliteration.
- Select the Obliterate button in the menu bar and follow the prompts
- Navigate to the Record Setup tab, search each associated Record Setup Design Name to be deleted, then select View
- Confirm that the Record Setup Design Name is not used in other Record Properties.
- Select Re-open, then the Delete tab, and select OK in the Confirmation window
- This is irreversible upon confirmation
- Repeat as needed for additional Record Setup Design Names
- The Setup may need to be Reactivated, then Re-open to see the Delete tab
- From the Record Setup tab, select the Template Designer tab
- Either search all by selecting the Search button or enter a Name, then Search to filter if there are too many
- Highlight the Template Design to be deleted, select the Delete tab, and then OK in the Delete Design window. This is irreversible upon confirmation after an undefined period. It is possible to find Deleted Templates that can then be Cloned.
- If the Design Template is Locked where the Edit and Delete buttons are inactivated, and a lock icon is displayed on the Template image, select the View button, then Unlock, then Go Back; search again, highlight the Template, and Delete.
- Navigate to the Photo Properties
- Highlight the Photo Property to be removed if you have rights
- Select Re-open, then the Delete tab, and select OK in the Confirmation window
- This is irreversible upon confirmation
- Repeat as needed for additional Photo Property Names
- The Property may need to be Reactivated, then Re-open to see the Delete tab
- Select Re-open, then the Delete tab, and select OK in the Confirmation window
- If you do not have user rights to Delete, you may have the rights to remove the association with the Property by selecting View, then Edit
- In the Organization drop tree, remove your Organization by de-selecting the radio button
- If the Organization states Root, ignore this step
- Highlight the Photo Property to be removed if you have rights
- Navigate to the Catalogs tab
- Search the Organization field by typing the Organization name
- If no Catalogs are found, then they are either not being used, or they are using a Root generic Catalog where the association will be removed once the Organization is deleted
- If found, Highlight the Catalog to be Inactivated
- Select the View tab and then the Deactivate tab, which will deactivate the Catalog.
- Inactivated Catalogs can be Re-activated by searching for the Catalog and selecting Activate.
- Select the View tab and then the Deactivate tab, which will deactivate the Catalog.
- Search the Organization field by typing the Organization name
- Navigate to the Admin tab
- Delete associated Stations, Queues, Fonts, and Families
- Navigate to the User tab
- Sort by and locate, or search using the Organization name
- Highlight and View the User
- Edit the Last Name, leaving only the First Initial
- Deactivate all associated users
- Navigate to the Notifications tab
- Sort by Organization, or scroll to the bottom and search for the Organization
- If no Notifications are found, they are either not being used or using Root generic Notifications where the association will be removed once the Organization is deleted.
- Inactivate all associated notifications.
- Sort by Organization, or scroll to the bottom and search for the Organization
- Navigate to the Organizations tab
- Move all associated Organizations to the !Inactive hierarchy
- Delete all associated Organizations, and if there are any Users, Templates, or properties of any kind, the Organization will be marked as Inactive.
- Off Portal Work
- Quickbooks
- Create a ticket for the Accounting Manager to inactivate the customer
- HubSpot
- Create a ticket for the Sales Manager to mark the Company as Customer Inactive, which should mark all Contacts.
- The Sales Manager should close any open Tickets and Deals.
- It is recommended to send a final update email that their account is closed and all of their data and photos have been obliterated.
- CUSTFILES
- Search for any files with PII data and photos, and delete them.
- Move the CUSTFILE customer root folder to !Inactive.
- Quickbooks
Clone
Allows you to make a copy/clone of the associate Card Group, and must be edited to change any associated Record Properties
Deactivate
When you select "Deactivate", the status of a Record Properties RP (Card Group) will be changed to "Inactive". This means that the RP will still be operational but with possibly limited features. However, please note that if you inactivate an RP, its information will eventually be permanently deleted/Obiterated and cannot be accessed later. So, please only deactivate an RP if you are sure that it will not be needed in the future. If you need to keep an RP in an inactive state for any period, then you must append the RP name with "OBLITERATE AFTER MMDDYY". Otherwise, it will be deleted without a stated date.
- ABC Rebadge OBLITAFTER 010124
Reopen
This will allow edits to be made to the Card Group, and always remember to Save edits and Activate them after completion
Assign Families
This will allow users with assigned rights to assign a Family to the card group, which allows the ability to move records from one Family to another
Define Catalog
Opens a Catalog edit tool within the Data Properties section
- Code Field - Select the correct field name
- Description Field- Select the correct field name
- Update card group design to use the new catalog
- Check if - The design is used by other card groups so that a new design will be created
Record Manager (Records)
 There are some Record Manager features in Record Properties that are not available in the Record Manager and are covered here.
Record Manager features that are only found in the Record Properties section:
View
Highlight one record via left mouse click, then select the View Icon to open the record
Record Manager
This takes the user to the Record Manager section
Generate Template
Select this option to export an empty Excel Template that can be provided to users to fill out with badge data to be imported using existing Data Definitions.
Create Card Proof
Create proof records per Template Designer badge logic type: Employee, Student, Visitor, Contractor, etc; select Create Card Proof which will create Sample Records with Proofing, and edit as needed.
Step 1: Select the Create Proof Card icon (user rights required)
Step 2: Enter the Number of proof cards needed and select Enter
- If there is only one card Design Template, only one is needed
- Otherwise, enter the number of card variations needed based on the assigned template
Step 3: Select one of the newly recreated Proof Card records, select the View icon, and edit it as needed to display a valid card to proof; including approving the photo
Step 4: Select the Generate Token icon, select the URL
Step 5: Copy the URL link and send it to approving recipients. (do not use the Send Link icon)
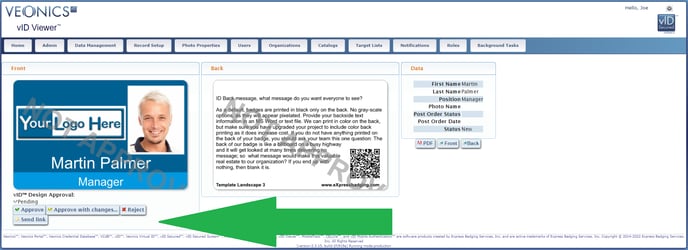
- Approve - Select to approve the Design as-is, and it will be printed with Approved merged data and photos using the same template
- Approve with Changes - Select to approve the Design with noted simple edits, and it will be printed based on approved edits along with Approved merged data and photos using the revised template
- Reject - Select to Not Approve, requiring further edits as noted or externally communicated
- Send Link - DO NOT USE