Most fonts will be assigned to the root organization to share them among all users. However, this field may be used to specify fonts available only to a particular organization, typically
because they have purchased the rights to a proprietary font.
For each font, the following representations are needed:
- TTF A file in the /includes/fonts folder, used to render the vID in JPEG format
- PHP+Z Two files in the /includes/font folder, generated with FPDF’s “makefont”
utility, to enable rendering the vID in PDF format - WOFF (optional, in /public/fonts) used to provide WYSIWYG rendering of the
font in the vID designer tool - CSS classes used to represent this font in the vID designer tool, whether a
WOFF file is present or not.
Fonts are classified by font family (Arial, Courier, etc.) and variant (Regular, Bold, Bold
Italic, Condensed, etc.). Not all variants will be available for all families,
mainly driven by the TTF files since GDI rendering cannot currently emulate
missing variants like Windows.
The provided fonts are in OTF format. Therefore, the critical first step is finding a converter to generate the TTF and WOFF files. With FDFP’s makefont tool, generating the PHP and Z files is possible.
One possible online converter: https://cloudconvert.com/otf-to-ttf
The process for uploading a new font starts with Admin/Fonts/New Font. In the dialog, enter information as follows: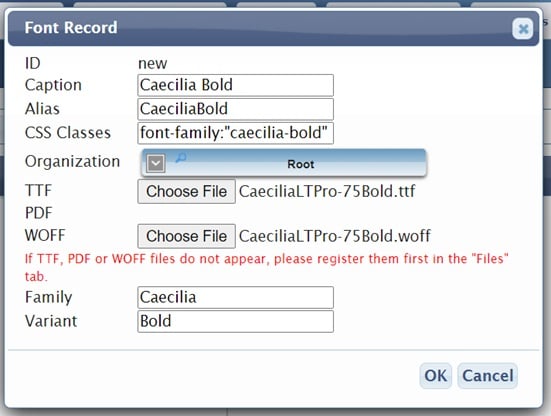
Caption: The name that will be used in the template editor to identify the font. A font family can contain multiple fonts, but this caption should be unique and fully descriptive (in the example, “Cecilia Bold”, and other fonts in the family would have names as “Cecilia Bold Italic”, “Cecilia Italic”, and so on).
Alias: this is used also in the template editor. Again, it must be unique. Also, it must contain letters only (no spaces, although dashes might work). Typically it would be the same as the caption, removing the spaces or substituting for dashes.
CSS Classes: these are the CSS classes that are generated for use in the template editor. For most uploaded fonts, this will be font-family:”xxxxxx”, where xxxxx is an all-lowercase, no-spaces version of the font caption (“caecilia-bold” in the example). The colon and quotes are important. Some system fonts, such as Arial, can have additional attributes.
Organization: the organization that has access to this font. Typically, it will be “Root” or “(common)”, but it may be necessary to restrict if an organization uses a proprietary font that is protected by specific rights and as such should not be made accessible to others.
TTF and WOFF Files: both are required. Please upload. PDF files are no longer used; instead, two additional files, “php” and “z” are automatically generated. See below.
Family: This is the font family name. It allows us to “group” fonts by family for simplicity. So, for all variants of this family, the name will be “Caecilia” (case sensitive).
Variant: (optional for single-variant fonts, required for font families). This distinguishes the specific variant within the family. This can be just “Bold”, “Bold Italic”, etc.
After hitting “OK,” the dialog will close, and the variant (and the new family, if that’s the case) will appear in the font tree. However, to confirm that the file was successfully uploaded, please go to Admin/Files and go to the last page: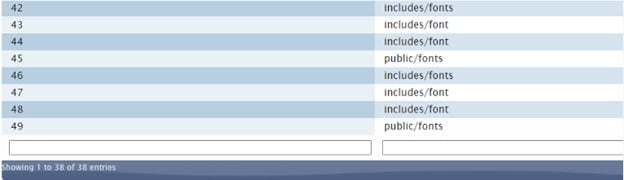
As can be seen, for each font variant, 4 files should appear:
- TTF file: in folder /includes/fonts
- PHP file: generated automatically using the makefont tool, in folder /includes/font
- Z file: also generated automatically using the makefont tool, also in folder /includes/font
- WOFF file: in folder /public/fonts
The new font and variant should become immediately available in the Template Editor (if it is already open, it will be necessary to reopen the page). Please confirm a test design by creating a text element with source “Fixed” and some test text, then previewing the thumbnail and PDF.
One final note: when deleting a font, please also go to Admin/Files and delete all four files corresponding to that font. Please do so to avoid conflicts if the font is re-uploaded in the future. Also, because fonts are linked to files automatically when uploaded via the Add Font dialog, please refrain from uploading such files from the Admin/Files tab unless specifically required to do so (typically, to replace a corrupted file).