
Before You Begin
To enable Visitor Management, send an email to:
Request that we:
- Enable the standard Visitor Badge template set
- Configure the Visitor Badge Record Property
- Enable associated Template Designer components
- Confirm which users require Visitor Badge access rights
Please let us know:
- Whether all Veonics® Portal users should have Visitor Badge access
- Whether visitor badges will be printed at one or multiple locations
- Whether you plan to use PVC badges, adhesive labels, or paper badge workflows
Licensing and Setup Notes
The standard Visitor Badge setup is generally included within your existing Veonics® Portal licensing, provided the deployment remains within standard Print Station guidelines.
Typically:
- One Print Station is required per physical badge printing location
Additional professional service fees may apply for:
- advanced badge design
- custom workflows
- operator training
- large deployment assistance
If the setup involves only:
- enabling the standard Visitor Badge templates
- basic configuration
- less than approximately 15 minutes of setup
there is typically no additional charge.
Creating Your First Visitor Badge Workflow
Once your “Visitor Badge” Record Property has been enabled:
- Open the Data Management Tab
- Locate and highlight Visitor Badge card group
- Select: Record Manager
The Record Manager is where authorized users can:
- Create visitor records
- Edit visitor records
- Activate or inactivate records
- Log lost or unreturned badges
- Maintain the visitor registry
Create a Test Visitor Record
Before going live, create one sample visitor badge record for testing purposes.
- Select New Record
- Enter sample visitor information
- Select Save/Continue
- Select Generate Token
- This generates the Veonics® Virtual ID associated with the visitor badge.
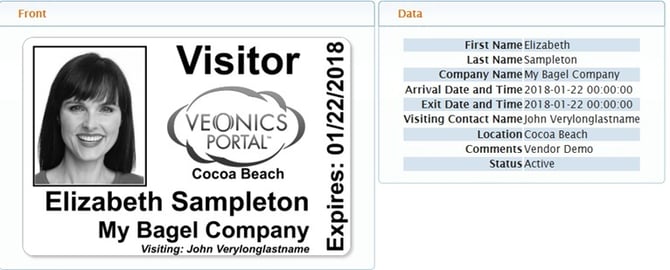
- Select the vID link to preview the badge.
- The default visitor template is configured so that:
- If a visitor photo is captured, the image prints on the badge
- If no photo is present, a large “V” placeholder prints automatically
Editing Visitor Badge Templates
Visitor badge templates may be customized using the Template Designer that is located within the Record Setup Tab.
Select the Search button that displays all Templates assigned to your Organization. Highlight the Visitor Badge template, and select the Edit button. Tip, if you are making a second design, use the Clone button to make a copy.
Organizations may customize:
- Logos
- Colors
- Visitor wording
- Badge layouts
- Numbering formats
- Security messaging
- Expiration wording
After making changes:
- Select Save
- Return to the Virtual ID preview
- Refresh the preview page to view live updates
User Rights and Permissions
If you do not see:
- Record Setup
- Template Designer
- Visitor Badge tabs
then your user account likely does not currently have sufficient access rights.
In this situation:
- Your administrator may assist you
OR - You may request access authorization from eXpress badging®
For security purposes:
- Permission requests should include approval from the organization’s Primary Point of Contact (PPOC)
If you are the PPOC:
- Our records will reflect your authorization rights
Printing Generic Visitor Badges
For visitors who only require temporary short-duration access, many organizations issue:
- generic numbered visitor badges
Examples:
- V001
- V025
- V100
Many organizations pre-print badge batches:
- Print enough so you do not have to reissue the same number for several weeks to a month.
Suggested Generic Badge Workflow
Example:
- Jane Smith receives badge V025
- Upon return, the visitor badge record can be:
- left alone if no recording is desired
- is looked up, and date/time stamped up exit
- the returned badge is placed at the bottom of the stack
- If not returned, the badge may be marked Lost or Inactive within the Record Manager
Organizations may optionally:
- maintain handwritten logs
- record visitor names in badge comments
- maintain digital visitor references
Visitor Pre-Registration
To improve front-desk efficiency, organizations may encourage employees to:
- notify reception in advance
- submit visitor information before arrival
This allows staff to:
- pre-register guests
- assign visitor badges in advance
- pre-print visitor credentials
- reduce check-in delays
Many organizations simply attach a note to the visitor badge for quick identification upon arrival.
Printing Personalized Visitor Badges
For longer-term visitors or organizations requiring personalized credentials:
- Open Visitor Badge Record Manager
- Select New and enter visitor information
- Select Save/Continue
- Select Generate Token to preview the Virtual ID before printing
- Make any needed edits, then Save/Approve
- Select Print and follow prompts to print the badge
Visitor Badge Return Recommendations
Organizations are encouraged to:
- provide a secure visitor badge return box
- display signage requesting badge return upon exit
Example signage: “Please Return All Visitor Badges”
Returned badges may then be:
- manually logged
- reactivated
- marked returned
Lost or unreturned badges should be marked: Lost
within the Visitor Badge Record Manager.
Photo Capture Options
Organizations may optionally capture visitor photos using:
- Live camera capture
- Uploaded photo files
- Veonics® CELLfie workflows
Live Photo Capture
To capture photos live:
- Connect a compatible camera to the workstation
- Open the visitor record
- Select: Capture
- Follow the prompts
Uploading Existing Photos
To upload a saved photo:
- Open the visitor record
- Select Upload
- Browse and Choose File
- Select file and Save
- Adjust and center the image to correct attributes
- Select Check All and then Accept
Using Veonics® CELLfie
If enabled, the Veonics® CELLfie feature allows visitors to:
- upload their own photos remotely
- capture photos using their mobile device
- update certain fields with information
- who the are seeing
- license tag number
- Arrival date and time
Workflow:
- Enter the visitor’s email address
- Send the CELLfie request
- This is a customer-defined template in Notifications
- Visitor uploads or captures their image
- Visotor may update some data elements
- Staff reviews, crops, and approves the image
If the email request feature is unavailable:
- the CELLfie feature may not currently be enabled on your account
Visitor Badge Printer Options
Organizations may choose from several printing methods depending on operational needs.
Option 1 — Existing PVC Badge Printer
Ideal for:
- lower visitor volumes
- occasional visitor printing
- cost-conscious deployments
Organizations may:
- reuse existing employee badge printers
- create separate visitor templates
- pre-print temporary visitor badges
Option 2 — Dedicated Front Desk PVC Printer
Ideal for:
- higher visitor volumes
- personalized badge issuance
- reception-based operations
Organizations may choose:
- single-sided printers
- monochrome K-panel ribbons
- full-color printing workflows
Pre-registration allows badges to be printed before arrival when needed.
Option 3 — Adhesive Label Printers
A popular option for:
- high-volume visitor environments
- fast front-desk issuance
- lower supply costs
Label options include:
- blank labels
- preprinted labels
- color labels
- self-expiring labels
Common sizes include:
- 3” x 2”
- 4” x 2”
Badge backers and lanyards may also be used to improve durability and visibility.
Option 4 — Inkjet or Laser Printed Badges
Ideal for:
- lower-volume environments
- temporary deployments
- organizations using existing office printers
Badges may be:
- printed on paper stock
- inserted into clear badge holders
- worn using clips or lanyards
Visitor Badge Holder Options
Common holder options include:
- Bulldog strap clips
- Breakaway shoelace-style lanyards
- Folded clear holders
- Adhesive badge backers
Badge backers may also be color-coded for operational identification purposes.
Reporting
The Veonics® Portal does not currently include a built-in enterprise reporting engine.
However:
- visitor records
- transaction logs
- registry information
are available for screen review and may be exported into:
- spreadsheets
- databases
- external reporting tools
for additional analysis and reporting.
Optional Basic Tracking Workflows
The Veonics® Portal can optionally support basic scan-based visitor tracking workflows using:
- QR codes
- barcode readers
- inbound/outbound transaction logging
Workflow example:
- Visitor badge printed with QR code
- Operator scans badge upon entry
- Transaction logs In timestamp
- Visitor scans upon exit
- Transaction logs Out timestamp
Transaction data may then be exported for reporting purposes.
This workflow is intended for:
- lightweight visitor accountability
- basic attendance logging
- operational registry tracking
It is not intended to replace enterprise occupancy intelligence systems.
Please note:
- TRACK workflows require a separate paid engagement o
- utside standard Portal licensing.
Need Assistance?
The eXpress badging® team is available to assist with:
- setup guidance
- template configuration
- workflow recommendations
- printing recommendations
- visitor badge best practices
If you encounter a roadblock during setup:
let us know — we are here to help.