Table of Contents
Stations and Queues
Stations (Print Stations) and Queues (Print Queues) are used for setting up the ability to define what Organization-Users can print, and what printers are used. Printing is set up and licensed by Print Locations.
Print Locations
The Veonics Portal is licensed by Print Locations and the number of printers permitted/supported per location. A Print Location is a physical address or campus with assigned staff to manage printing and issuance. If Human Resources and Security have two separate printing teams, one must be defined as the lead team supporting the other. Otherwise, a second print station is required. For additional locations, like the South Campus, or a separate off-campus address in another part of the city or state, additional Print Stations are needed.
Print "Stations"
To print using the vPQM desktop tool, a user must be issued a Print “Station” that is used to link a Designated System User, Organization, and printers (Print Queue) together for print management and tracking.
To set up a Station:
- An Organization must be created
- A User must be created with the “VPQM System User” role
- Should this be VCDM System User"?
- Select the New tab from the Admin Tab
- For Stations:
- Fill out the Station/Main tab information below
- Select Save once completed
- Select Edit if editing an existing Station
- Parameters and License tabs should be ignored in the Station/Main tab
- For Stations:
- Station name:
- Example: bsmith Station
- Description:
- Security 1
- Designated System User:
- bsmith
- Organization:
- ABC Cocoa Beach
- Type :
- Always "VPQM"
- License Expiration:
- Inactive
Ques (Print Queues)
An organization may create as many queues as allowed by their particular agreement.
It is imperative that, while it is not (and cannot be) enforced, two vPQM™ stations should never be printing simultaneously from the same queue. It may result in duplicate printouts.
It is recommended to have at least one Print Queue for each physical printer in the organization. Even additional ones to hold cards with special requirements, such as composite, RFID, magnetic stripe, security seal stocks, etc. If there are too many queues, consider creating a single “entry point” queue to send “normal” jobs to the printer.
It is possible to reassign groups of cards from one Print Queue to another. Additionally, create a “proofing” queue to manage an approval process before batch printing hundreds or thousands of cards.
Setup the Print Queue attributes in the Que/Main tab:
- A system-assigned ID is automatically generated
- Assign a free-text Queue name that easily defines its purpose
- Security1
- HR1
- StudentSVC1
- Assign to the correct Organization hierarchy for visibility filtering
- Users at “lower” level tiers can send jobs to a queue set “above” them
- Only users at the same queue level or higher can be “operators” of that queue and print
- Assign as a Proofing Queue: Yes or No
- See Proofing Queue below
- Custom fields are rarely used and can help operators identify the capabilities of printers printing from this queue.
- More help should be provided here
Cards Tab
Displays a list of Card Records currently awaiting printing in the Print Queue. The record must be in the approved state to enable a card record to be printed.
User Tab
Add and Remove Users to the Print Queue. The User tab displays a list of users who can send and print/release jobs to this queue if they have the appropriate User permissions.Proofing Print Queues
When batch printing hundreds of cards, an interim proofing process may be neeFontsded to preview all cards before printing, Proofing Print Queues allows cards to be sent and printed in PDF format but does not mark them as Printed.
Usually, when a card is sent to a queue and is printed, it is moved to the “Printed” Status state.
Reprints must be explicitly requested since there may be other processes associated. They are then tracked as reprints. This PDF Print Preview Process (P4) is a significant middle step in the printing process. The card record Status remains "Approved" until they are resent to the actual Print Queue, where the Status is updated to "Printed."
Once released, printing to a Proofing Queue, it composes letter-sized pages with eight images (either four dual-sided cards or eight single-sided cards) and prints them to an assigned paper printer. However, it is recommended to use a PDF printer to generate a file compatible with Adobe Acrobat that can be viewed by many for approval. The print job can be broken up, so the first stage is proofed for print approval, then once approved, it is released, and prepared for issuance, while additional batches are proofed, approved, and printed until all are issued.
Files
Displays a list of files and the ability to add files as well. Mose files are font files uploaded from the Font tab or help PDFs accessed on the home page.
Fonts
The Portal has all the available fonts needed and provides edit rights over them. New ones can be added, but adding specific fonts causes issues in the template designer.
Adding Fonts into the Portal
Please note the following from the Architecture document:
Most fonts will be assigned to the root organization to share with all users. However, this field may be used to specify fonts available only to a particular organization, typically
because they have purchased the rights to a proprietary font. For each font, the
following representations are needed:
- TTF A file in the /includes/fonts folder, used to render the vID in JPEG format
- PHP+Z Two files in the /includes/font folder, generated with FPDF’s “makefont”
utility, to enable rendering the vID in PDF format - WOFF (optional, in /public/fonts) used to provide WYSIWYG rendering of the
font in the vID designer tool - CSS classes used to represent this font in the vID designer tool, whether a
WOFF file is present or not.
Fonts are classified by font family (Arial, Courier, etc.) and variant (Regular, Bold, Bold
Italic, Condensed, etc.). Not all variants will be available for all families, and that is
mainly driven by the TTF files available since GDI rendering cannot currently emulate
missing variants the way Windows does.
The provided fonts are in OTF format. Therefore, the critical first step is finding a converter to generate the TTF and WOFF files. With FDFP’s makefont tool, it is possible to generate the PHP and Z files needed.
One possible online converter: https://cloudconvert.com/otf-to-ttf
Uploading Fonts
The process for uploading a new font starts with Admin/Fonts/New Font. In the dialog enter information as follows: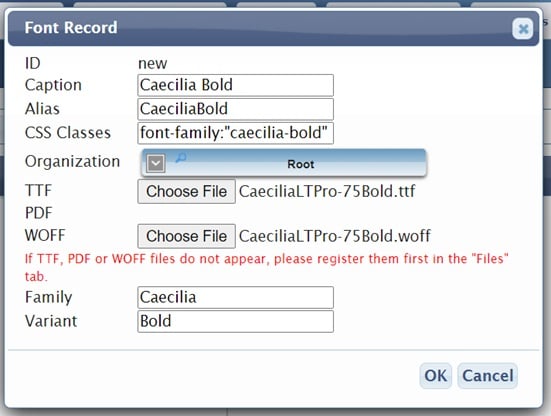
- Caption: The name that will be used in the template editor to identify the font. A font family can contain multiple fonts, but this caption should be unique and fully descriptive (in the example, “Cecilia Bold”, and other fonts in the family would have names as “Cecilia Bold Italic”, “Cecilia Italic”, and so on).
- Alias: this is also used in the template editor. Again, it must be unique. Also, it must contain letters only (no spaces, although dashes might work). Typically it would be the same as the caption, removing the spaces or substituting for dashes.
- CSS Classes: these are the CSS classes generated for use in the template editor. For most uploaded fonts, this will be font-family:”xxxxxx”, where xxxxx is an all-lowercase, no-spaces version of the font caption (“caecilia-bold” in the example). The colon and quotes are important. Some system fonts, such as Arial, can have additional attributes.
- Organization: the organization that has access to this font. Typically it will be “Root” or “(common),” but it may be necessary to restrict if an organization uses a proprietary font that is protected by specific rights and, as such, should not be made accessible to others.
- TTF and WOFF Files: both are required. Please upload. PDF files are no longer used, but instead, two additional files, “PHP” and “z,” are automatically generated. See below.
- Family: This is the font family name. It allows us to “group” fonts by family for simplicity of use. So, for all variants of this family, the name will be “Caecilia” (case sensitive).
- Variant: (optional for single-variant fonts, required for font families). This distinguishes the specific variant within the family. This can be just “Bold,” “Bold Italic,” etc.
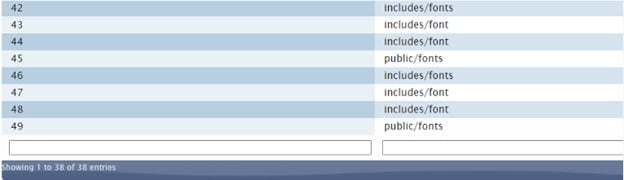
After hitting “OK,” the dialog will close, and the variant (and the new family, if that’s the case) will appear in the font tree. However, to confirm that the file was successfully uploaded, please go to Admin/Files and go to the last page:
- TTF file: in folder /includes/fonts
- PHP file: generated automatically using the makefont tool, in folder /includes/font
- Z file: also generated automatically using the makefont tool, also in folder /includes/font
- WOFF file: in folder /public/fonts
The new font and variant should become immediately available in the Template Editor (if it is already open, it will be necessary to reopen the page). Please confirm using a test design by creating a text element with source “Fixed” and some test text and then doing a preview both in the thumbnail and in PDF.
One final note: when deleting a font, please make sure to also go to Admin/Files and delete all four files corresponding to that font. Failure to do so may cause conflicts if the font is re-uploaded in the future. Also, because fonts are linked to files automatically when uploaded via the Add Font dialog, please refrain from uploading such files from the Admin/Files tab unless specifically required to do so (typically, to replace a corrupted file).
Downloads
This has the VPQM and the VCDB downloads.
This feature requires further definition.
Updates
Updates Available and Application Key are currently unused and have no known features.

Family
The Family feature allows Card records to be moved within an Organization's Record Properties that use the Record Setup.